How to Build a JavaFX App with Open Library API

I recently ran into a great Programming with Frameworks exam question that turned out to be an interesting hands-on exercise:
Open Library (https://openlibrary.org/) is a website that offers access to a multitude of online books. Develop a JavaFX application that uses the Open Library API to perform the following tasks:
- Allow the user to enter a book title into a form and submit the search.
- Display the search results one book at a time in the UI, including:
- Book title
- Book cover
- Book author(s)
- First publish year
- Users should be able to navigate through the results using “Previous” and “Next” buttons:
- The “Previous” button should be disabled when viewing the first book.
- The “Next” button should be disabled when viewing the last book.
- If no books are found, display a message such as “No books found.”
This turned into a complete JavaFX desktop app that talks to the Open Library API and lets the user interactively browse through book results.
In this post, I will walk through how I approached the question, what choices I made while building it, and where you could extend or improve it if you want to take the idea further. I’ll also include notes on tricky parts like configuring VM options.
You can see the full source on GitHub.
Planning the Build
Before writing any code, I broke the task into manageable components:
1. API Understanding
The Open Library API provides a public endpoint you can query by appending a book title to this base URL:
1
https://openlibrary.org/search.json?title=YOUR_QUERY_HERE
When you make a GET request to that URL, the server responds with a JSON object containing metadata about books that match your search.
The key I’m most interested in is “docs”. It holds an array of search results, where each item is a JSON object representing a single book. Each of these objects can include fields such as:
“title”: the book’s title
“author_name”: an array of author names
“first_publish_year”: the earliest known publication year
“cover_i”: an ID used to load the cover image from Open Library’s cover service
Example response structure (simplified):
1
2
3
4
5
6
7
8
9
10
11
12
{
  "numFound": 54,
  "docs": [
    {
      "title": "Harry Potter and the Sorcerer's Stone",
      "author_name": ["J.K. Rowling"],
      "first_publish_year": 1997,
      "cover_i": 1234567
    },
    ...
  ]
}
Your app iterates over this docs array to build a list of Book objects that can be displayed in the UI.
For full documentation, visit the Open Library Search API documentation.
2. JavaFX Design
The interface would need:
- A text input (TextField)
- A button to trigger the search
- A section to display the results: title, authors, year, and cover image
- Two buttons to allow the user to move between results
3. Data Modeling
I created a simple Book class to represent each result, holding the title, authors, publish year, and cover ID.
4. Controller Logic
I implemented logic to:
- Call the API and fetch results
- Convert JSON data into a list of
Bookobjects - Track the current index
- Enable or disable navigation buttons as needed
5. Edge Case Handling
I accounted for scenarios where:
- No results are returned
- Some books don’t have authors or cover images
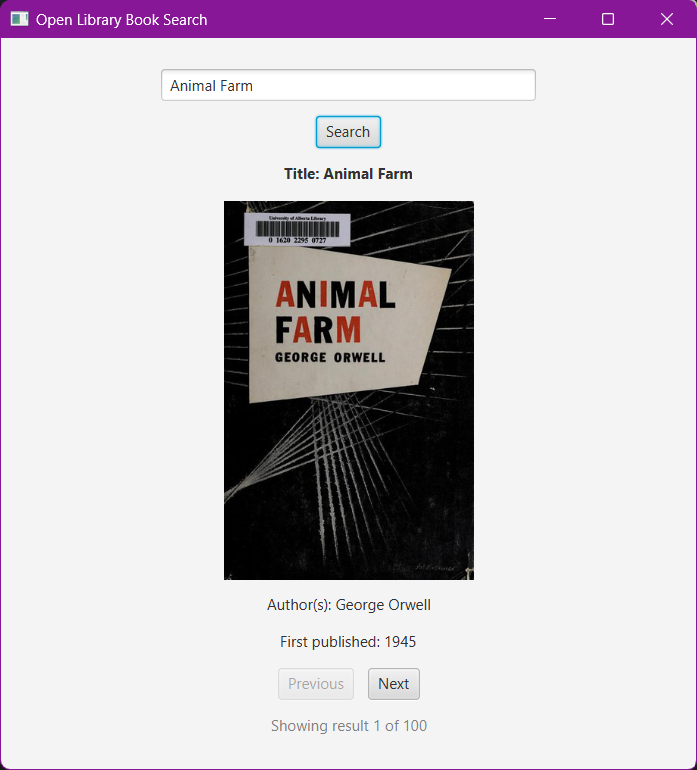
What the App Does
- Accepts a book title input from the user
- Sends a search request to the Open Library API
- Displays the first result with:
- Title
- Author(s)
- First publish year
- Cover image (if available)
- Users can flip through results using “Previous” and “Next” buttons
Example output:
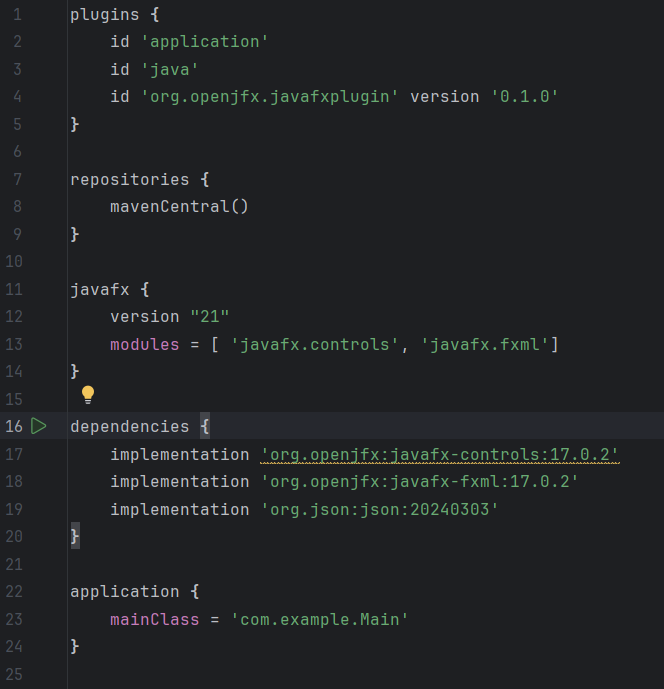
Step 1: Project Setup with Gradle
In your build.gradle, start with the necessary plugins:
1
2
3
4
5
plugins {
    id 'application'
    id 'java'
    id 'org.openjfx.javafxplugin' version '0.1.0'
}
Now configure JavaFX:
1
2
3
4
javafx {
    version = "21"
    modules = [ 'javafx.controls', 'javafx.fxml' ]
}
Dependencies:
1
2
3
4
5
dependencies {
    implementation 'org.openjfx:javafx-controls:21'
    implementation 'org.openjfx:javafx-fxml:21'
    implementation 'org.json:json:20240303'
}
Make sure your application block is configured:
1
2
3
application {
    mainClass = 'com.example.Main'
}
Your final build should look something like this:
Step 2: FXML UI Layout
Create book_search.fxml under src/main/resources/com/example/. The layout includes input, result display, and navigation:
1
2
3
4
5
6
7
8
9
10
11
12
13
14
15
16
17
18
19
20
<VBox alignment="CENTER" spacing="12.0" xmlns="http://javafx.com/javafx"
      xmlns:fx="http://javafx.com/fxml"
      fx:controller="com.example.BookSearchController"
      style="-fx-padding: 20;">

    <TextField fx:id="searchField" promptText="Enter book title" maxWidth="300"/>
    <Button text="Search" onAction="#handleSearch"/>

    <Label fx:id="titleLabel" style="-fx-font-weight: bold;"/>
    <ImageView fx:id="coverImage" fitWidth="200" preserveRatio="true"/>
    <Label fx:id="authorLabel"/>
    <Label fx:id="yearLabel"/>

    <HBox spacing="10" alignment="CENTER">
        <Button fx:id="prevButton" text="Previous" onAction="#handlePrev"/>
        <Button fx:id="nextButton" text="Next" onAction="#handleNext"/>
    </HBox>

    <Label fx:id="statusLabel" textFill="gray"/>
</VBox>
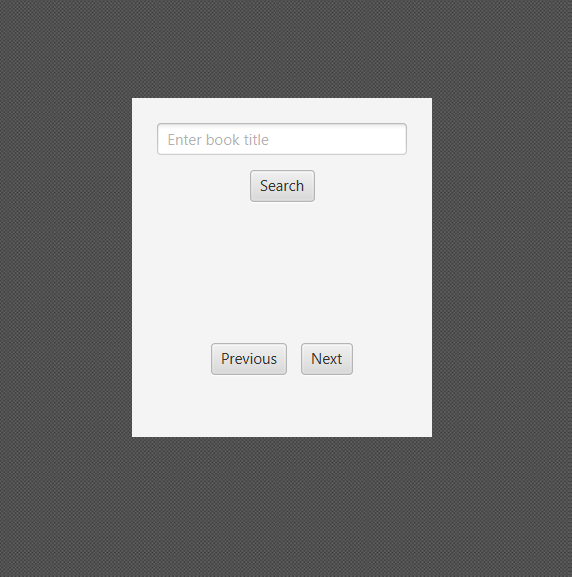
Note: The ImageView was added to display book cover images fetched from the Open Library API, and the Label elements were initialized without content so they could be dynamically updated with the book title, authors, and publish year once the user performs a search. As you can see below, they are not visible in the layout without any content.
Step 3: The Controller
The controller manages how the application interacts with both the Open Library API and the JavaFX UI. Here’s a breakdown of the most important logic and how it fits together.
1. Handling the Search
When the user clicks the “Search” button, the method handleSearch() is triggered:
1
2
3
4
5
6
7
8
9
10
11
12
13
14
15
16
17
18
19
20
21
@FXML
public void handleSearch() {
    String title = searchField.getText().trim();
    if (title.isEmpty()) return;

    try {
        bookResults = searchBooks(title);
        if (bookResults.isEmpty()) {
            statusLabel.setText("No books found.");
            clearDisplay();
            prevButton.setDisable(true);
            nextButton.setDisable(true);
        } else {
            currentIndex = 0;
            updateDisplay();
        }
    } catch (Exception e) {
        e.printStackTrace();
        statusLabel.setText("Error fetching results.");
    }
}
This function reads the user input, sends it to the API through a helper method, and updates the UI depending on whether results are found.
2. Making the API Request
To search for books by title, your app constructs a URL based on the user’s input and sends an HTTP GET request to the Open Library API. Here’s how that looks in Java:
1
2
String encoded = URLEncoder.encode(title, StandardCharsets.UTF_8);
String url = "https://openlibrary.org/search.json?title=" + encoded;
URLEncoder.encode(...)ensures that special characters and spaces in the user input are properly formatted for a URL.The full URL might end up looking like:
https://openlibrary.org/search.json?title=harry+potter
Once the URL is built, we create and send the HTTP request using Java’s HttpClient:
1
2
3
4
5
HttpClient client = HttpClient.newHttpClient();
HttpRequest request = HttpRequest.newBuilder()
    .uri(URI.create(url))
    .build();
HttpResponse<String> response = client.send(request, HttpResponse.BodyHandlers.ofString());
HttpClientis used to manage HTTP requests.HttpRequestis configured to send a simple GET request to the API.response.body()contains the JSON string returned by Open Library.
Now, we parse the JSON using org.json:
1
2
JSONObject root = new JSONObject(response.body());
JSONArray docs = root.getJSONArray("docs");
rootrepresents the top-level JSON object.docsis the array of book entries.
Each item in the docs array is a book record. We loop over it and extract the data we need:
1
2
3
4
5
6
7
8
9
10
11
for (int i = 0; i < docs.length(); i++) {
    JSONObject obj = docs.getJSONObject(i);
    String bookTitle = obj.optString("title");
    List<String> authors = obj.has("author_name")
        ? obj.getJSONArray("author_name").toList().stream().map(Object::toString).toList()
        : List.of("Unknown");
    int year = obj.optInt("first_publish_year", 0);
    int coverId = obj.optInt("cover_i", -1);

    books.add(new Book(bookTitle, authors, year, coverId));
}
Here we’re:
Using
optStringandoptIntto safely read fields, avoiding exceptions if data is missing.Converting the
author_nameJSON array into a JavaList<String>.Handling missing cover IDs by defaulting to
-1.
The final result is a list of Book objects ready to be displayed in the UI.
3. Updating the UI
Once the list of Book objects has been populated from the API response, the app needs to display one book at a time in the UI. This is handled by the updateDisplay() method in the controller.
Here’s how the method works, broken down by what each part does:
1
Book book = bookResults.get(currentIndex);
This grabs the current Book object from the list based on the currentIndex, which is updated when the user clicks Next or Previous.
Displaying Text Information
1
2
3
titleLabel.setText("Title: " + book.getTitle());
authorLabel.setText("Author(s): " + String.join(", ", book.getAuthors()));
yearLabel.setText("First published: " + book.getFirstPublishYear());
These lines populate the JavaFX
Labelelements with the corresponding fields from theBookobject.If multiple authors are present, they are joined into a single string using commas.
Loading the Cover Image
1
2
3
4
5
6
if (book.getCoverId() != null && book.getCoverId() > 0) {
    String url = "https://covers.openlibrary.org/b/id/" + book.getCoverId() + "-L.jpg";
    coverImage.setImage(new Image(url, true));
} else {
    coverImage.setImage(null);
}
Open Library hosts cover images separately. You can fetch them by appending the
coverIdto a special URL.The
ImageView(coverImage) is updated dynamically with this image.If the book has no valid
coverId, the image is cleared.
Updating Navigation and Status
1
2
3
statusLabel.setText("Showing result " + (currentIndex + 1) + " of " + bookResults.size());
prevButton.setDisable(currentIndex == 0);
nextButton.setDisable(currentIndex == bookResults.size() - 1);
A helpful status message shows the user where they are in the list.
The Previous button is disabled on the first result, and Next is disabled on the last one to prevent out-of-bounds navigation.
In short, this method makes the UI responsive to both search results and user interaction. Every time the index changes or a new search is performed, updateDisplay() ensures the visible UI stays in sync with the underlying data.
Step 4: Supporting Classes
Book.java
This is a simple model class to hold each book’s data:
1
2
3
4
5
6
7
8
9
10
11
12
13
14
15
16
17
18
public class Book {
    private final String title;
    private final List<String> authors;
    private final Integer firstPublishYear;
    private final Integer coverId;

    public Book(String title, List<String> authors, Integer year, Integer coverId) {
        this.title = title;
        this.authors = authors;
        this.firstPublishYear = year;
        this.coverId = coverId;
    }

    public String getTitle() { return title; }
    public List<String> getAuthors() { return authors; }
    public Integer getFirstPublishYear() { return firstPublishYear; }
    public Integer getCoverId() { return coverId; }
}
It’s used in the controller to store and render information from the JSON API response.
Main.java
This is the application entry point that loads the FXML and starts the app:
1
2
3
4
5
6
7
8
9
10
11
12
13
14
public class Main extends Application {
    @Override
    public void start(Stage stage) throws Exception {
        FXMLLoader loader = new FXMLLoader(getClass().getResource("/com/example/book_search.fxml"));
        Scene scene = new Scene(loader.load());
        stage.setTitle("Open Library Book Search");
        stage.setScene(scene);
        stage.show();
    }

    public static void main(String[] args) {
        launch(args);
    }
}
This class sets up the JavaFX stage and scene and loads the FXML layout, which looks like this:
Step 5: Launching the App
To run the app successfully, you must configure VM options so JavaFX modules are recognized.
In IntelliJ (or any IDE), go to your run configuration and set the following VM options:
1
--module-path /path/to/javafx-sdk/lib --add-modules javafx.controls,javafx.fxml
Without this step, the app will throw module resolution errors at launch.
Note: Replace
/path/to/javafx-sdk/libwith the actual file path to thelibdirectory inside your downloaded JavaFX SDK.
Step 6: Packaging as a Jar (Optional)
If you want to distribute your app or run it without relying on Gradle or an IDE, you can build a standalone .jar file.
Create the JAR
From the root of the project, run:
1
./gradlew clean jar
This will generate a JAR file under:
1
build/libs/
Example:
1
build/libs/openlibrary-app.jar
Running the JAR
To run the JAR manually, use:
1
java --module-path /path/to/javafx-sdk/lib --add-modules javafx.controls,javafx.fxml -jar build/libs/openlibrary-app.jar
Reminder: Replace
/path/to/javafx-sdk/libwith the actual path to your JavaFX SDK’s lib directory.
This step is optional but helpful if you’re planning to share the app with others or want to test it as a standalone program.
Final Thoughts
This project showed how practical and approachable JavaFX can be for building lightweight desktop applications. Pairing it with a public API like Open Library made the whole thing feel useful and complete.
It started as an exam question, but it turned into a functional and extensible little app. If you’re looking for a JavaFX idea that combines UI with real-world data via an API, this is a great one to start with.
Check out the full source on GitHub.